1. Intro
Big Data powered machine learning and deep learning has yielded impressive advances in many fields. One example is the release of ImageNet, consisting of more than 15 million labeled, high-resolution images across 22,000 categories, which revolutionized the field of computer vision. State-of-the-art models have already achieved 98% top-five accuracy on the ImageNet dataset, so it seems as though these models are foolproof and that nothing can go wrong.
However, recent advances in adversarial training have found that this is an illusion. A good model misbehaves frequently when faced with adversarial examples. The image below illustrates the problem:
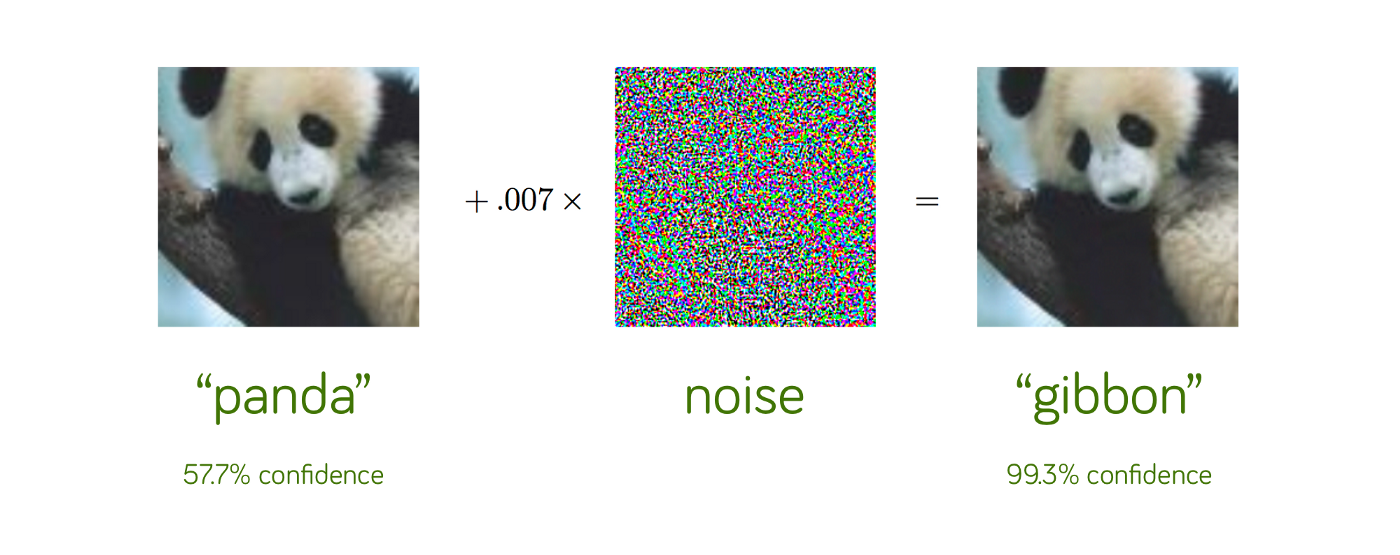
The model initially classifies the panda picture correctly, but when some noise, imperceptible to human beings, is injected into the picture, the resulting prediction of the model is changed to another animal, gibbon, even with such a high confidence. To us, it appears as if the initial and altered images are the same, although it is radically different to the model. This illustrates the threat these adversarial attacks pose — we may not perceive the difference so we cannot tell an adversarial attack as happened. Hence, although the output of the model may be altered, we cannot tell if the output is correct or incorrect.
This formed the motivation behind Professor Ling Liu’s keynote speech at the 2019 IEEE Big Data Conference, where she touched on types of adversarial attacks, how adversarial examples are generated, and how to defend against these attacks. Without further ado, I will get into the contents of her speech.
2. Types of adversarial attacks
Adversarial attacks are classified into two categories — targeted attacks and untargeted attacks.
The targeted attack has a target class, Y, that it wants the target model, M, to classify the image I of class X as. Hence, the goal of the targeted attack is to make M misclassify by predicting the adversarial example, I, as the intended target class Y instead of the true class X. On the other hand, the untargeted attack does not have a target class which it wants the model to classify the image as. Instead, the goal is simply to make the target model misclassify by predicting the adversarial example, I, as a class, other than the original class, X. Researchers have found that in general, although untargeted attacks are not as good as targeted attacks, they take much less time. Targeted attacks, although more successful in altering the predictions of the model, come at a cost (time).
3. How are Adversarial Examples Generated
Having understood the difference between targeted and untargeted attacks, we now come to the question of how these adversarial attacks are carried out. In a benign machine learning system, the training process seeks to minimize the loss between the target label and the predicted label, formulated mathematically as such:
\[\theta^{*} = \underset{\theta}{\mathrm{argmin}} \; \frac{1}{N}\sum_{i=1}^{N} L\big(H_{\theta}(x_i), y_i\big)\]During the testing phase, the learned model is tested to determine how well it can predict the predicted label. Error is then calculated by the sum of the loss between the target label and the predicted label, formulated mathematically as such:
\[\mathrm{Error} = \sum_{i=1}^{N} L\big(H(x_i), y_i\big)\]In adversarial attacks, the following 2 steps are taken:
- The query input is changed from the benign input x to \(x^\prime\).
- An attack goal is set such that the prediction outcome, \(H(x)\) is no longer \(y\). The loss is changed from \(L(H(x_i), y_i)\) to \(L(H(x_i), y^{\prime}_i)\) where \(y^{\prime}_i \ne y_i\).
4. Adversarial Perturbation
One way the query input is changed from x to x’ is through the method called “adversarial perturbation”, where the perturbation is computed such that the prediction will not be the same as the original label. For images, this can come in the form of pixel noise as we saw above with the panda example. Untargeted attacks have the single goal of maximizing the loss between H(x) and H(x’) until the prediction outcome is not y (the real label). Targeted attacks have an additional goal of not only maximizing the loss between H(x) and H(x’) but also to minimize the loss between H(x’) and y’ until H(x’) = y’ instead of y.
Adversarial perturbation can then be categorized into one-step and multi-step perturbation. As the names imply, the one-step perturbation only involves a single stage — add noise once and that is it. On the other hand, the multi-step perturbation is an iterative attack that makes small modifications to the input each time. Therefore, the one-step attack is fast but excessive noise may be added, hence making it easier for humans to detect the changes. Furthermore, it places more weight on the objective of maximizing loss between H(x) and H(x’) and less on minimizing the amount of perturbation. Conversely, the multi-step attack is more strategic as it introduces small amounts of perturbation at each time. However, this also means such an attack is computationally more expensive.
5. Black Box VS White Box Attacks
Now that we have looked at how adversarial attacks are generated, some astute readers may realize one fundamental assumption these attacks take on — that the attack target prediction model, H, is known to the adversary. Only when the targeted model is known can it be compromised to generate adversarial examples by changing the input. However, attackers do not always know or have access to the targeted model. This may sound like a surefire way to ward off these adversarial attackers, but the truth is that black box attacks are also highly effective. Black box attacks are based on the notion of transferability of adversarial examples — the phenomenon whereby adversarial examples, although generated to attack a surrogate model G, can achieve impressive results when attacking another model H. The steps taken are as follows:
- The attack target prediction model H is privately trained and unknown to the adversary.
- A surrogate model G, which mimics H, is used to generate adversarial examples.
- By using the transferability of adversarial examples, black box attacks can be launched to attack H.
This attack can be launched either with the training dataset being known or unknown. In the case where the dataset is known to the adversary, the model G can be trained on the same dataset as model H to mimic H.
When the training dataset is unknown, however, adversaries can leverage Membership Inference Attacks, whereby an attack model whose purpose is to distinguish the target model’s behavior on the training inputs from its behavior on the inputs it did not encounter during training is trained. In essence, this turns into a classification problem to recognize differences in the target model’s predictions on the inputs that it trained on versus the inputs that it did not train on. This enables the adversary to obtain a better sense of the training dataset D which model H was trained on, enabling the attacker to generate a shadow dataset S on the basis of the true training dataset so as to train the surrogate model G. Having trained G on S where G mimics H and S mimics D, black box attacks can then be launched on H.
5.1 Black Box Attacks
Now that we have seen how black box attacks vary from white box attacks in that the target model H is unknown to the adversary, we will cover the various tactics used in black box attacks. Beyond the transferability-based approach described above (train a surrogate model and hope the adversarial examples transfer), black box attacks generally fall into two further families:
- Score-based attacks: the adversary cannot see the model’s weights or gradients, but can query it and observe the output probabilities (the confidence scores). Methods such as ZOO (Zeroth Order Optimization) use these repeated queries to numerically estimate the gradient of the loss with respect to the input, and then craft a perturbation from that estimate, without ever needing the true gradient.
- Decision-based attacks: the adversary can only observe the final predicted label — no probabilities at all. Techniques like the Boundary Attack start from a large, obviously adversarial perturbation and iteratively shrink it while walking along the decision boundary, using only the model’s yes/no answer (“is this still misclassified?”) at each step.
Both families trade off query efficiency against attack strength: the less information the attacker can see, the more queries it typically takes to find a good adversarial example, which also makes these attacks easier to detect from unusual query patterns.
5.2 White Box Attacks
In a white box setting the adversary has full access to the model — its architecture, its weights, and, critically, its gradients. This is the setting where adversarial perturbations are cheapest to compute, because the attacker can directly ask “in which direction should I nudge each input pixel to increase the loss the most?” and get an exact answer via backpropagation. A few well-known white box attacks:
- FGSM (Fast Gradient Sign Method), introduced by Goodfellow et al. in 2014, is the simplest and fastest of the bunch — a one-step attack (see Section 4) that perturbs every pixel by a fixed amount in the direction of the gradient’s sign:
Here \(\epsilon\) controls how large the perturbation is allowed to be. Small \(\epsilon\) keeps the noise imperceptible; large \(\epsilon\) makes the attack more reliable but easier to spot. We implement this exact attack from scratch in the mini project below.
- PGD (Projected Gradient Descent), proposed by Madry et al. in 2017, is essentially FGSM applied iteratively with a small step size, projecting the result back into an \(\epsilon\)-ball around the original image after every step. It is a multi-step attack, so it is slower than FGSM but far more effective, and is widely used as the standard benchmark for evaluating a model’s robustness.
- JSMA (Jacobian-based Saliency Map Attack) targets a small number of pixels rather than perturbing the whole image, using the model’s Jacobian to find the pixels whose change most increases the probability of the target class.
- Carlini & Wagner (C&W) attack formulates the search for an adversarial example as an optimization problem that directly minimizes the size of the perturbation subject to the example being misclassified, and remains one of the strongest attacks against undefended models.
5.3 Physical Attacks
One simple way in which the query input is changed from x to x’ is by physically adding something (e.g., a bright color or pattern) to disturb the model. One example is how researchers at CMU added eyeglasses to a person in an attack against facial recognition models. The image below illustrates the attack:
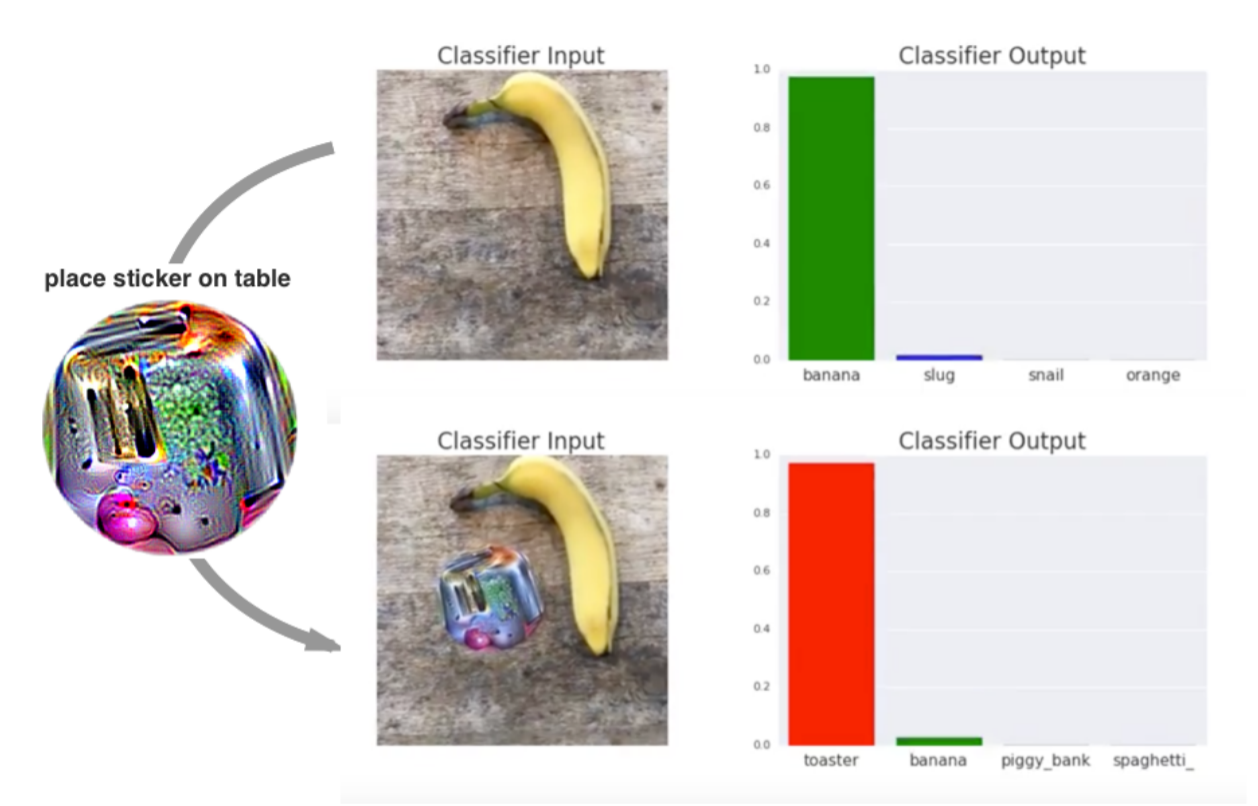
The first row of images corresponds to the original image modified by adding the eyeglasses, and the second row corresponds to the impersonation targets, which are the intended misclassification targets. Just by adding the eyeglasses onto the original image, the facial recognition model was tricked into classifying the images on the top row as the images in the bottom row.
Another example comes from researchers at Google who added stickers to the input image to change the classification of the image, as illustrated by the image below:
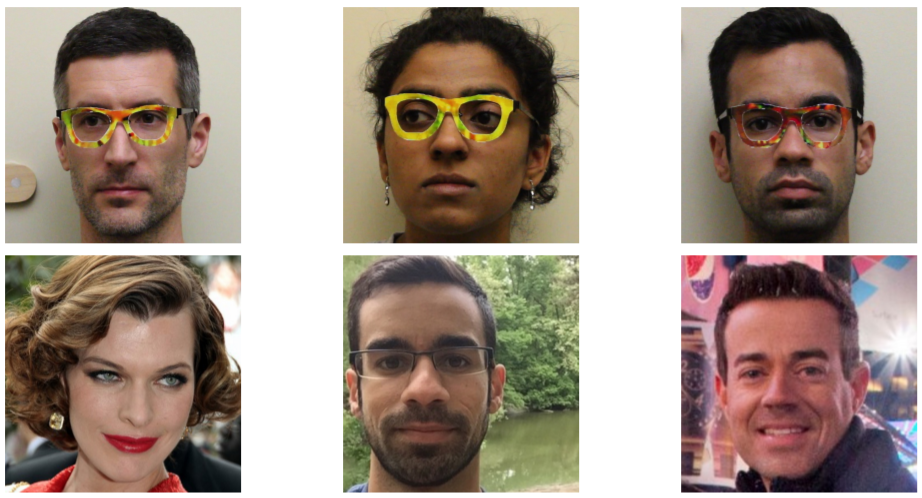
These examples show how effective such physical attacks can be.
5.4 Out of Distribution (OOD) Attack
Another way in which black box attacks are carried out is through out-of-distribution (OOD) attacks. The traditional assumption in machine learning is that all train and test examples are drawn independently from the same distribution. In an OOD attack, this assumption is exploited by providing images of a different distribution from the training dataset to the model, for example feeding TinyImageNet data into a CIFAR-10 classifier which would lead to an incorrect prediction with high confidence.
6. How Can We Trust Machine Learning?
Now that we have taken a look at the various types of adversarial attacks, a natural question then comes — how can we trust our machine learning models if they are so susceptible to adversarial attacks?
One possible approach has been proposed by Chow et al. in 2019 in the paper titled “Denoising and Verification Cross-Layer Ensemble Against Black-box Adversarial Attacks”. The approach is centered around enabling machine learning systems to automatically detect adversarial attacks and then automatically repair them through the use of denoising and verification ensembles.
7. Denoising Ensembles
First, input images have to pass through denoising ensembles that attempt different methods to remove any added noise to the image, for example adding Gaussian noise. Since the specific noise added to the image by the adversary is unknown to the defender, there is a need for an ensemble of denoisers to each attempt to remove each type of noise.
The image below shows the training process for the denoising autoencoder — the original image is injected with some noise that the attacker might inject, and the autoencoder tries to reconstruct the original uncorrupted image. In the training process, the objective is to reduce the reconstruction error between the reconstructed image and the original image.
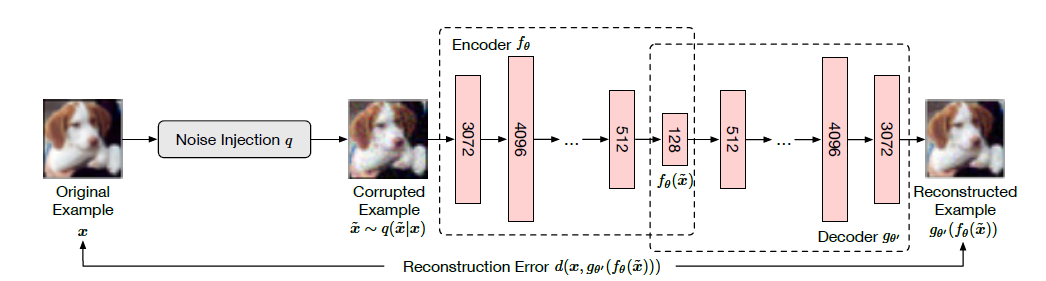
By developing an ensemble of these autoencoders each trained to remove a specific type of noise, the hope is that the corrupted images would be sufficiently denoised such that it is close to the original uncorrupted image to allow for image classification.
7.1 Verification Ensemble
After the images have been denoised, they then go through a verification ensemble which reviews every denoised image produced by each denoiser and then classifies the denoised image. Each classifier in the verification ensemble classifies each denoised image, and the ensemble then votes to determine the final category the image belongs to. This means that although some images may not have been denoised the correct way in the denoising step, the verification ensemble votes on all the denoised images, thereby increasing the likelihood of making a more accurate prediction.
7.2 Diversity
Diversity of the denoisers and verifiers has been found to be very important. Firstly, because adversarial attackers will keep getting better at altering images, there is a need for a diverse group of denoisers that can handle a variety of corrupted images. Following this, there is also a need for verifiers to be diverse, so they can generate a variety of classifications, making it difficult for adversarial attackers to manipulate them, just as they have managed to manipulate the normal classifiers that we trust and use so frequently in machine learning.
This remains an open problem because, after all these decisions by the various verifiers, there is still a final decision maker that needs to decide whose opinion to listen to. The final decision maker would need to preserve the diversity present in the ensemble, which is not an easy task to tackle.
8. Mini Project: Implementing FGSM From Scratch
Reading about adversarial attacks is one thing, watching a model fall for one is another. In this section, we’ll implement the Fast Gradient Sign Method (FGSM) from Section 5.2 completely from scratch using only NumPy — no TensorFlow or PyTorch — so every line of the attack is visible with nothing hidden behind a library call.
8.1 The Setup
To keep the project runnable on a laptop in a few seconds, we’ll train a small multinomial logistic regression classifier (a single linear layer + softmax — essentially a one-layer neural network) on the scikit-learn digits dataset: 1,797 grayscale images of handwritten digits (0–9), each only 8×8 pixels.
import numpy as np
from sklearn.datasets import load_digits
from sklearn.model_selection import train_test_split

np.random.seed(0)

digits = load_digits()
X = digits.data / 16.0   # scale pixel values to [0, 1]
y = digits.target

X_train, X_test, y_train, y_test = train_test_split(
    X, y, test_size=0.2, random_state=0
)

n_features = X_train.shape[1]  # 64 (8x8 pixels)
n_classes = 10
8.2 Training the Classifier
Even a linear model is a valid attack target — in fact, a model this simple makes it easy to write out the attack’s gradient by hand and check that the implementation matches the math from Section 5.2.
def one_hot(labels, n_classes):
    out = np.zeros((len(labels), n_classes))
    out[np.arange(len(labels)), labels] = 1
    return out

def softmax(z):
    z = z - z.max(axis=1, keepdims=True)
    exp_z = np.exp(z)
    return exp_z / exp_z.sum(axis=1, keepdims=True)

W = np.random.randn(n_features, n_classes) * 0.01
b = np.zeros(n_classes)

Y_train_oh = one_hot(y_train, n_classes)
lr, epochs = 0.1, 300

for epoch in range(epochs):
    logits = X_train @ W + b
    probs = softmax(logits)
    loss = -np.mean(np.sum(Y_train_oh * np.log(probs + 1e-12), axis=1))

    grad_logits = (probs - Y_train_oh) / len(X_train)
    W -= lr * (X_train.T @ grad_logits)
    b -= lr * grad_logits.sum(axis=0)

def predict(x):
    return np.argmax(softmax(x @ W + b), axis=1)

clean_acc = np.mean(predict(X_test) == y_test)
print(f"Clean test accuracy: {clean_acc:.4f}")
Clean test accuracy: 0.9250
92.5% test accuracy on clean, unperturbed digits — good enough to make the point.
8.3 The Attack
For a softmax classifier with cross-entropy loss, the gradient of the loss with respect to the input has a clean closed form: it’s just the prediction error (predicted probabilities minus the one-hot true label) projected back through the weight matrix. That means we can implement FGSM in three lines, directly mirroring the formula from Section 5.2, \(x' = x + \epsilon \cdot \mathrm{sign}(\nabla_x L)\):
def fgsm_attack(x, y_true, epsilon):
    y_true_oh = one_hot(np.array([y_true]), n_classes)
    probs = softmax(x.reshape(1, -1) @ W + b)
    grad_logits = probs - y_true_oh            # dL / d(logits)
    grad_x = grad_logits @ W.T                 # dL / dx, via the chain rule
    x_adv = x + epsilon * np.sign(grad_x).flatten()
    return np.clip(x_adv, 0.0, 1.0)             # keep valid pixel range
Note this is an untargeted white box attack in the taxonomy of Sections 2 and 5: we have full access to W and b, and the only goal is to push the prediction away from the true label, not toward any particular target class.
8.4 Watching the Model Fail
Let’s run the attack on a handful of test images the model originally classified correctly, using \(\epsilon = 0.15\):
epsilon = 0.15
for i in range(5):
    x, y_true = X_test[i], y_test[i]
    x_adv = fgsm_attack(x, y_true, epsilon)
    pred_clean = predict(x.reshape(1, -1))[0]
    pred_adv = predict(x_adv.reshape(1, -1))[0]
    print(f"true={y_true}  clean_pred={pred_clean}  adversarial_pred={pred_adv}")
true=8  clean_pred=8  adversarial_pred=2
true=8  clean_pred=8  adversarial_pred=3
true=5  clean_pred=5  adversarial_pred=2
true=6  clean_pred=6  adversarial_pred=1
true=6  clean_pred=6  adversarial_pred=1
Every single one of these digits, correctly classified moments ago, is now confidently wrong. Plotting the clean and adversarial pairs side by side makes it clearer what’s going on:
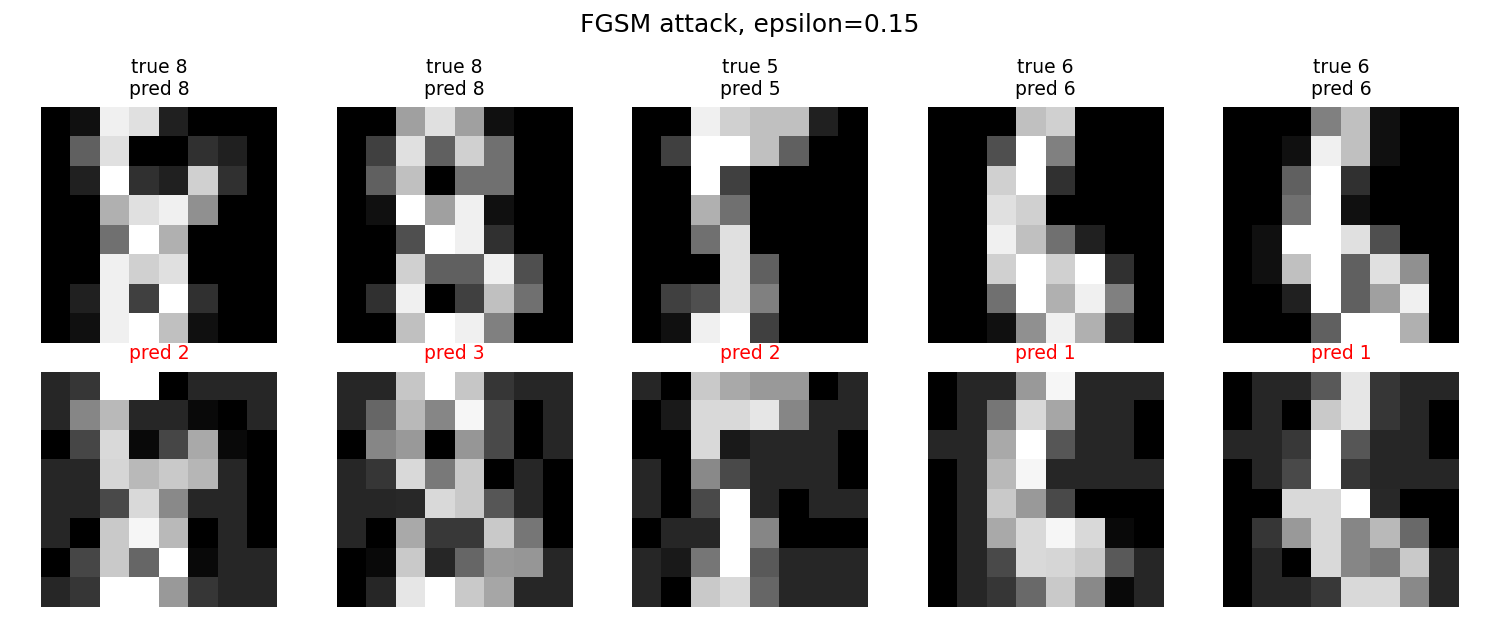
Because these source images are only 8×8 pixels (rather than a high-resolution photo like the panda from Section 1), the added noise is more visible than it would otherwise be. Even so, the digit is still clearly readable to a human on the bottom row, while the model’s prediction (in red) has been flipped entirely — exactly the property that makes adversarial examples so dangerous: the input still “looks right” to us, but not to the model.
8.5 How Much Damage Does Epsilon Do?
Finally, let’s sweep \(\epsilon\) from 0 (no attack) up to 0.5 and measure test accuracy across the whole test set at each step, to see how quickly a model degrades as the perturbation budget grows:
epsilons = np.linspace(0, 0.5, 11)
accs = []
for eps in epsilons:
    X_adv = np.array([fgsm_attack(X_test[i], y_test[i], eps) for i in range(len(X_test))])
    accs.append(np.mean(predict(X_adv) == y_test))
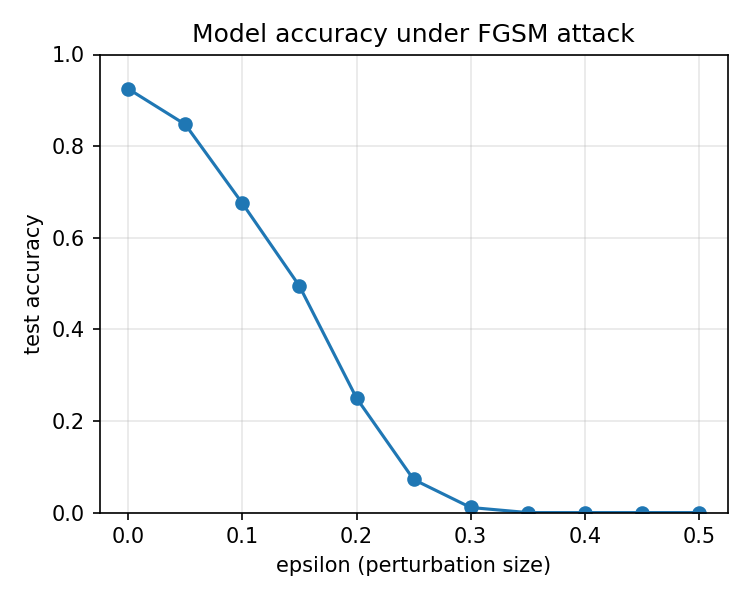
At \(\epsilon = 0\) the model performs at its clean 92.5% accuracy, as expected. But by \(\epsilon = 0.15\) — still a fairly small perturbation — accuracy has already collapsed to under 50%, and by \(\epsilon = 0.3\) the model is essentially guessing randomly. All of this from a one-line, one-step attack against a model whose gradients we could compute by hand. It’s a small-scale demonstration, but the same idea — nudging every pixel in the direction that most increases the loss — is exactly what breaks state-of-the-art convolutional networks in the panda example from Section 1, just with a deeper network and a costlier gradient computation behind it.
The full script (data loading, training, attack, and both plots) is under 100 lines of NumPy and is a good starting point for experimenting further — try a deeper MLP instead of a linear model, implement PGD by looping FGSM with a small step size, or measure how much a simple defense like the denoising ensembles from Section 7 recovers.
9. Conclusion
We have taken a look at various types of adversarial attacks, seen one of them fool a real classifier hands-on, and covered a promising method to defend against these attacks. This is definitely something to keep in mind when we implement machine learning models. Instead of blindly trusting the models to produce the correct results, we need to guard against these adversarial attacks and always think twice before we accept the decisions made by these models.
A huge thanks to Professor Liu for this enlightening keynote on this pressing problem in machine learning!
References
- I. J. Goodfellow, J. Shlens, and C. Szegedy, “Explaining and Harnessing Adversarial Examples”. arXiv, 2014.
- Tensorflow blog tutorials
- Adverserial Machine Learning
- Attacking Machine Learning with Adversarial Examples
- Breaking neural networks with adversarial attacks
- A. Madry, A. Makelov, L. Schmidt, D. Tsipras, and A. Vladu, “Towards Deep Learning Models Resistant to Adversarial Attacks”. arXiv, 2017.
- scikit-learn: Optical recognition of handwritten digits dataset
Comment Channel