
1. Intro
Some days, we hear some stories around the world that governments argue with people about some wrong laws, opaque decisions, bad economic environment, financial corruption, and many other reasons. To control the situation, one of their solutions is to disconnect people from the world by forcing ISPs and top-tier provider companies to shut down their internet connections. Some of these countries are China, North Korea, And the Islamic Republic Of Iran. The people living in these countries may do their jobs with the internet and in other words, their life has a direct relation with the connectivity to online services. In this situation, some necessary jobs that are in scathe are Developers, online shops, reporters, and many more. As a developer, I can’t live without the internet and my professional life is mixed with this technology. So I have to solve this problem by myself and in this case, I can’t accept the government’s politics. Let’s begin.
2. What is the solution
How can we access the outside world? to access the outside world, we need to access a machine that is connected to the internet. We can access the world through that machine. In these situations, governments wouldn’t disconnect data centers from the internet because some bad things can happen to their servers and their companies will be at huge risk, especially in terms of security. So we can conclude that data centers that are inside the country are still connected to the internet and can access the outside world.
If we could successfully be connected to the world via a machine in the local data center, there still would be a problem for our freedom, cruel sanctions of the united states, which prevent these poor people to access services and contents which is accessible by other people in the world. To tackle this problem, we need a second machine which is in another country and is accessible through the internet. We have to send our packets using that second machine to be fully free. To do so, we need to make a virtual private network(VPN).
2.1 Virtual Private Network (VPN)
A virtual private network extends a private network across a public network and enables users to send and receive data across shared or public networks as if their computing devices were directly connected to the private network. The benefits of a VPN include increases in functionality, security, and management of the private network.
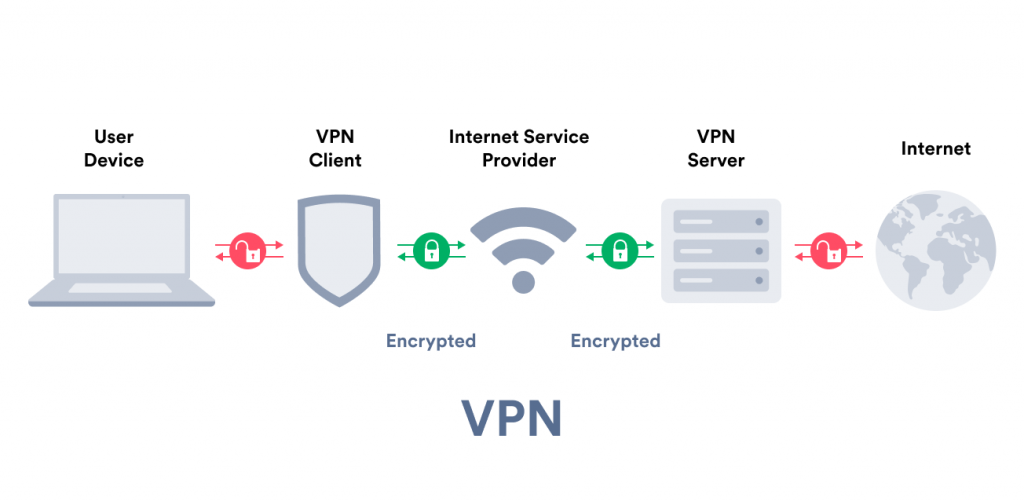
It provides access to resources that are inaccessible on the public network and is typically used for remote workers. Encryption is common, although not an inherent part of a VPN connection. A VPN is created by establishing a virtual point-to-point connection through the use of dedicated circuits or with tunneling protocols over existing networks. A VPN available from the public Internet can provide some of the benefits of a wide area network. From a user perspective, the resources available within the private network can be accessed remotely (Wikipedia).
3. Running a WireGuard VPN server on Ubuntu 20.04 (LTS)
WireGuard is a communication protocol and free and open-source software that implements encrypted virtual private networks, and was designed with the goals of ease of use, high speed performance, and low attack surface. It aims for better performance and more power than IPsec and OpenVPN, two common tunneling protocols (Wikipedia).
For this tutorial, I choose Wireguard as the VPN protocol of this article. Installation and configuration of the Wireguard VPN server are quite simple and easy to understand for those who are not familiar with some concepts of networking in Linux in comparison with other protocols such as OpenVPN.
To get started, you need a Virtual Machine(VM) accessible through the internet via SSH in outside world. Let’s assume my VM IP address is 77.222.67.140, I can connect to it using SSH as below:
$ ssh [email protected]
After running the command above, it asks you to type “yes” if you trust this host, just type “yes” and don’t ask why. Then you have to enter the VM password.
The first thing you do after connecting to the virtual machine is updating operating system packages to the latest available version using Aptitude Package Manager(apt):
$ apt update --yes
$ apt upgrade --yes
Note: It’s recommended that you reboot and reconnect to the VM after upgrading its packages.
Now we have to install wireguard and wireguard-tools using apt:
$ apt install wireguard --yes
$ apt install wireguard-tools --yes
This should install the Wireguard kernel module and the necessary tools for running our VPN server. If you would like to route your WireGuard Peer’s Internet traffic through the WireGuard Server then you will need to configure IP forwarding. To configure forwarding, open the /etc/sysctl.conf file using vim or your preferred editor:
$ vim /etc/sysctl.conf
Then you have to look for a line containing net.ipv4.ip_forward=1 and uncomment that line (remove leading #) Or, you can just add this text at the end of sysctl.conf file. If you are using IPv6 with WireGuard, uncomment/add line net.ipv6.conf.all.forwarding=1. If you are using both IPv4 and IPv6, ensure that you include both lines. Save and close the file when you are finished (if you were using vim press ESC then type wq and press enter). To read the file and load the new values for your current terminal session, run:
$ sysctl -p
If you did it right, you have to see an output as below:
net.ipv6.conf.all.forwarding = 1
net.ipv4.ip_forward = 1
Now your WireGuard Server will be able to forward incoming traffic from the virtual VPN ethernet device to others on the server, and from there to the public Internet. Using this configuration will allow you to route all web traffic from your WireGuard Peer via your server’s IP address, and your client’s public IP address will be effectively hidden.
However, before traffic can be routed via your server correctly, you will need to configure some firewall rules. These rules will ensure that traffic to and from your WireGuard Server and Peers flows properly.
3.1 Wireguard UI
Wireguard UI is a web-based config generator for wireguard server. If you’ve seen the DigitalOcean tutorial for running WireGurad server on ubuntu 20.04 which i pasted some parts of their tutorial here(Or other popular tutorials), they use the command line to generate configurations for clients which is called adding peers for wireguard server. Using command line interface and using wireguard-tool is quite hard to manage clients if you are making a network for your co-workers, family or friends. Wireguard-ui is a web-based interface for generating and managing client profiles and it’s written with go-lang which means that if you use its binary files which are available on their releases page, You don’t have to worry about running the application and it should work without any problems.
To start using wireguard-ui, you need to download the binary files first:
$ wget https://github.com/ngoduykhanh/wireguard-ui/releases/download/v0.3.7/wireguard-ui-v0.3.7-linux-amd64.tar.gz
Then unzip the downloaded file:
$ tar -xvf wireguard-ui-v0.3.7-linux-amd64.tar.gz
Before running wireguard-ui, you have to open port 5000 on your VM which is the default port of wireguard-ui:
$ ufw allow 5000 # Open 5000 port
$ ufw disable # stop the firewall
$ ufw enable  # start the firewall
Now, run wireguard-ui using:
$ ./wireguard-ui
Note: If the above command failed, make sure that you gave the run access to that binary file using
$ chmod +x wireguard-ui
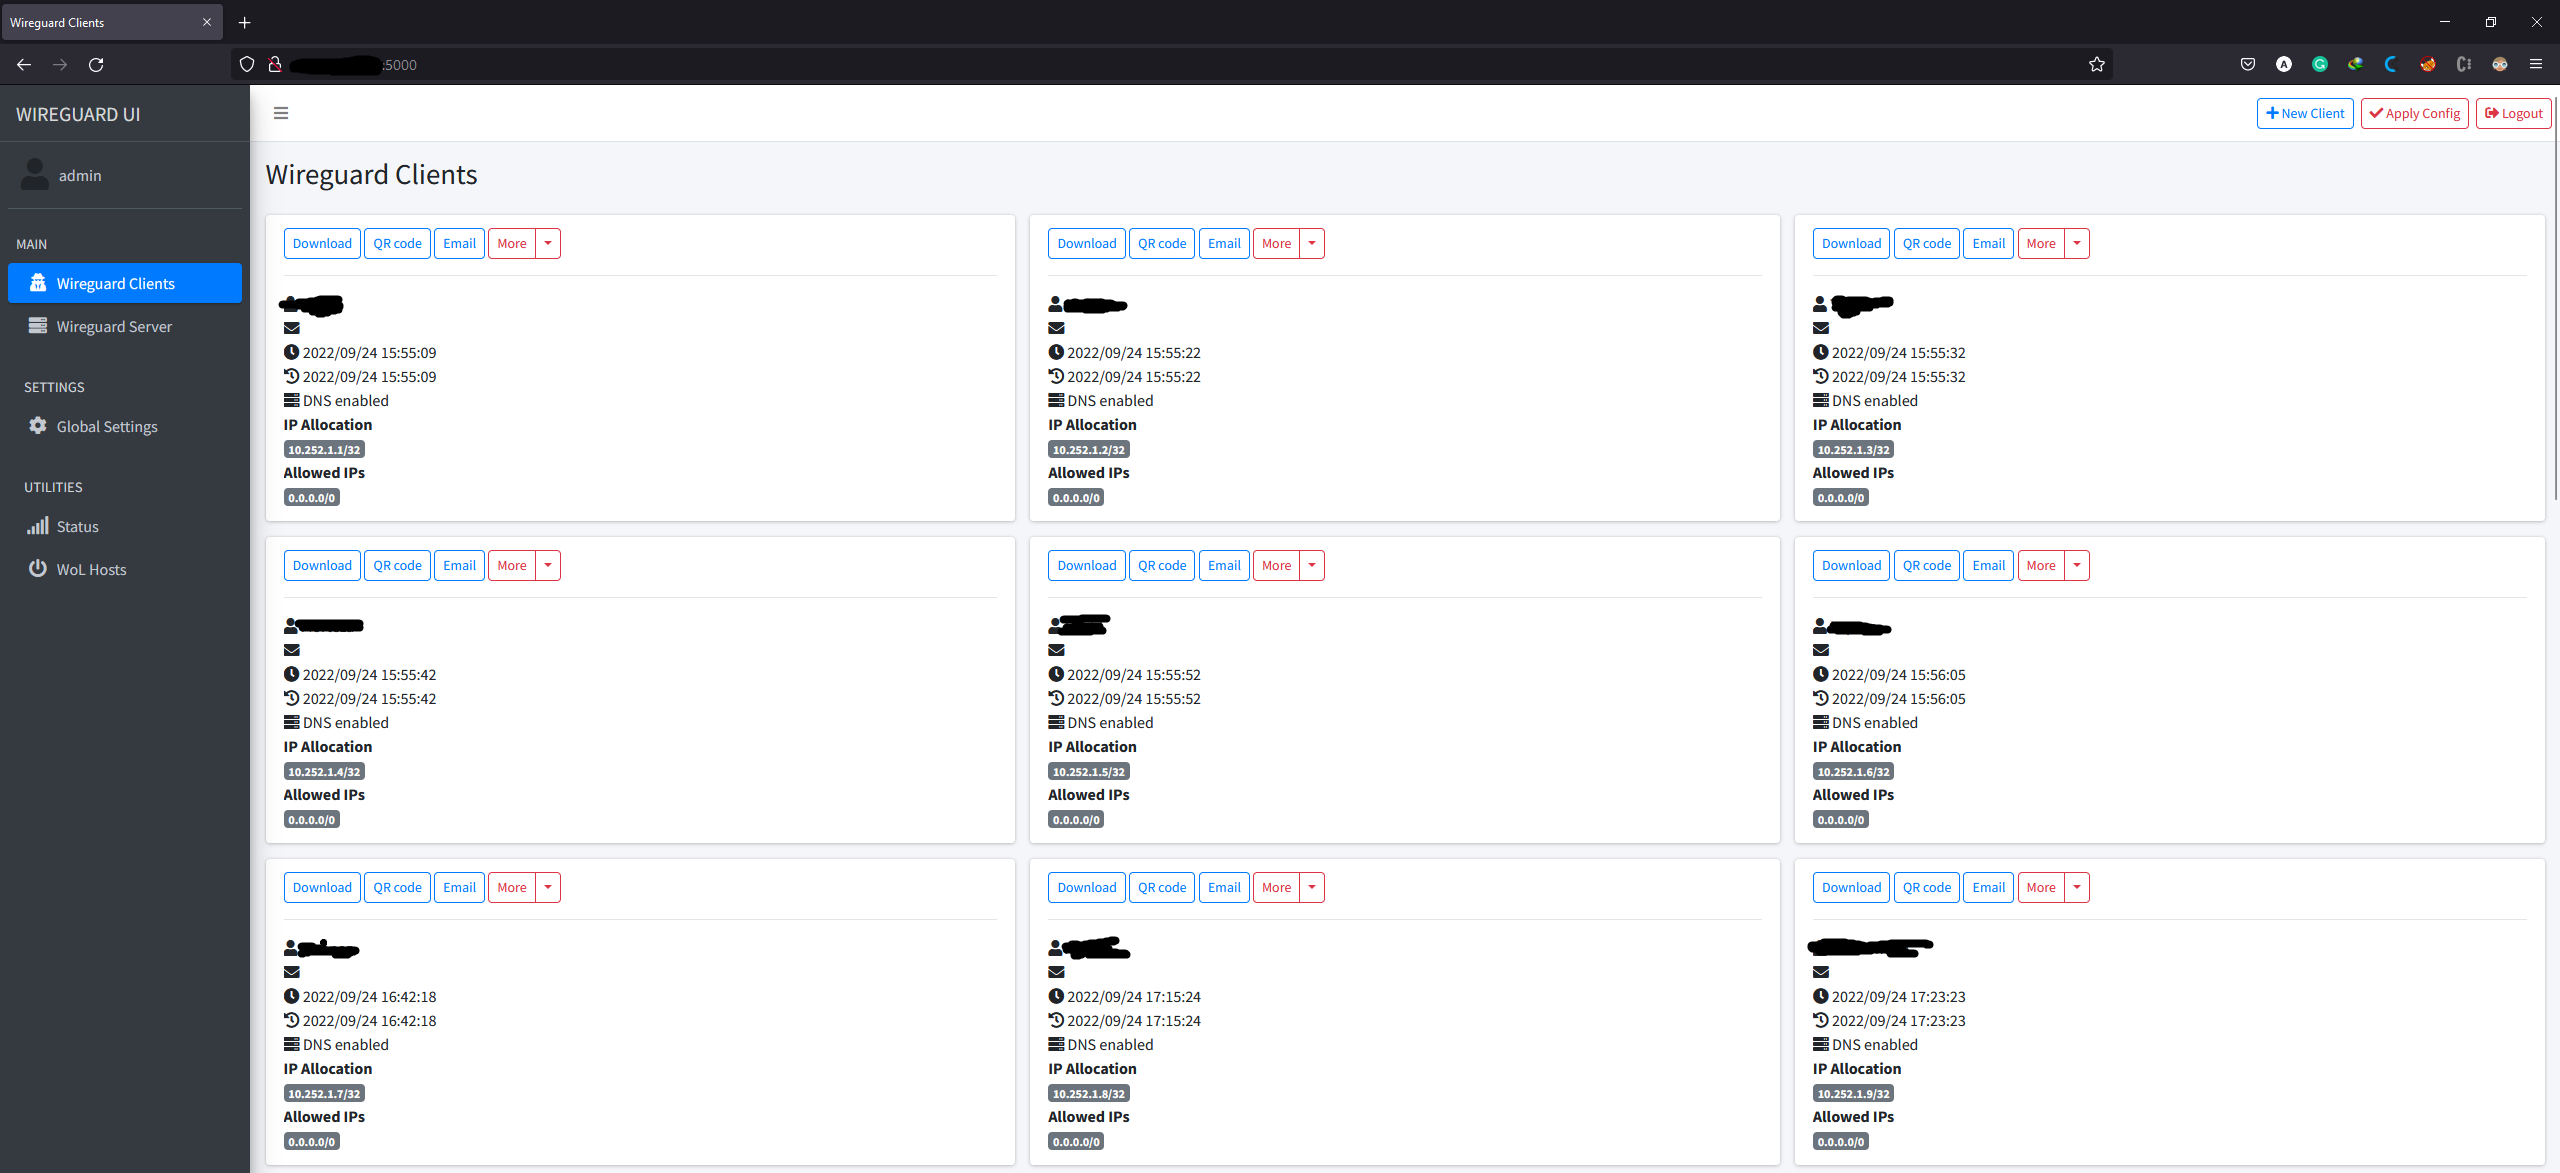
After running wireguard-ui you can open your browser and type YOUR_MACHINE_ADDRESS:5000 at the address bar and start using wireguard-ui. The default username and passwords for wireguard-ui are:
username: admin
password: admin
Login to the panel and make as many client as you want, then download the configuration files or save the qr code for each client. After you finished your job, press apply config and go back to your vm, terminate the wireguard-ui by pressing ctrl + c.
Note: Before making user clients, I recommend you to first change the server’s default port (then press
apply config) and then begin creating profiles.
Wireguard-ui should generate a configuration file and place it inside /etc/wireguard/wg0.conf. After terminating wireguard-ui, no further configurations are needed for adding clients and you can give the downloaded config files to your clients. To run the server there are two more steps to go with. One is configuring the server’s firewall and the other one is running wireguard server as a background service which is available in the next sections.
3.2 Configuring the WireGuard Server’s Firewall
In this section you will edit the WireGuard Server’s configuration to add firewall rules that will ensure traffic to and from the server and clients is routed correctly. As with the previous section, skip this step if you are only using your WireGuard VPN for a machine to machine connection to access resources that are restricted to your VPN.
To allow WireGuard VPN traffic through the Server’s firewall, you’ll need to enable masquerading, which is an iptables concept that provides on-the-fly dynamic network address translation (NAT) to correctly route client connections.
First find the public network interface of your WireGuard Server using the ip route sub-command:
$ ip route list default
The public interface is the string found within this command’s output that follows the word “dev”. For example, this result shows the interface named eth0, which is highlighted below:
default via 77.222.67.140 dev eth0 proto static
Note your device’s name since you will add it to the iptables rules in the next step. To add firewall rules to your WireGuard Server, open the /etc/wireguard/wg0.conf file with vim or your preferred editor again.
$ vim /etc/wireguard/wg0.conf
At the bottom of the file after the SaveConfig = true line, paste the following lines:
PostUp = ufw route allow in on wg0 out on eth0
PostUp = iptables -t nat -I POSTROUTING -o eth0 -j MASQUERADE
PostUp = ip6tables -t nat -I POSTROUTING -o eth0 -j MASQUERADE
PreDown = ufw route delete allow in on wg0 out on eth0
PreDown = iptables -t nat -D POSTROUTING -o eth0 -j MASQUERADE
PreDown = ip6tables -t nat -D POSTROUTING -o eth0 -j MASQUERADE
The PostUp lines will run when the WireGuard Server starts the virtual VPN tunnel. In the example here, it will add three ufw and iptables rules:
ufw route allow in on wg0 out on eth0- This rule will allow forwarding IPv4 and IPv6 traffic that comes in on the wg0 VPN interface to the eth0 network interface on the server. It works in conjunction with the net.ipv4.ip_forward and net.ipv6.conf.all.forwarding sysctl values that you configured in the previous section.iptables -t nat -I POSTROUTING -o eth0 -j MASQUERADE- This rule configures masquerading, and rewrites IPv4 traffic that comes in on the wg0 VPN interface to make it appear like it originates directly from the WireGuard Server’s public IPv4 address.ip6tables -t nat -I POSTROUTING -o eth0 -j MASQUERADE- This rule configures masquerading, and rewrites IPv6 traffic that comes in on the wg0 VPN interface to make it appear like it originates directly from the WireGuard Server’s public IPv6 address.
Note: You can run these command just after running the server without adding Post and Pre configs.
The PreDown rules run when the WireGuard Server stops the virtual VPN tunnel. These rules are the inverse of the PostUp rules, and function to undo the forwarding and masquerading rules for the VPN interface when the VPN is stopped.
In both cases, edit the configuration to include or exclude the IPv4 and IPv6 rules that are appropriate for your VPN. For example, if you are just using IPv4, then you can exclude the lines with the ip6tables commands.
Conversely, if you are only using IPv6, then edit the configuration to only include the ip6tables commands. The ufw lines should exist for any combination of IPv4 and IPv6 networks. Save and close the file when you are finished.
The last part of configuring the firewall on your WireGuard Server is to allow traffic to and from the WireGuard UDP port itself. If you did not change the port in the server’s /etc/wireguard/wg0.conf file, the port that you will open is 51820. If you chose a different port when editing the configuration be sure to substitute it in the following UFW command.
Note: In my experience data centers might close irregular ports such as the default Wireguard port
51820and I suggest you to choose a popular service port for your VPN connection. I usually prefer using database ports or streaming services ports that are working with data and high network traffic on these ports seems less suspicious. (i.e. MongoDB default port 27017)
In case you forgot to open the SSH port when following the prerequisite tutorial, add it here too:
$ ufw allow 51820/udp # The chosen VPN server port (you can change it to what ever you want)
$ ufw allow OpenSSH   # To be able to connect the server using openSSH trough port 22
Note: If you are using a different firewall or have customized your UFW configuration, you may need to add additional firewall rules. For example, if you decide to tunnel all of your network traffic over the VPN connection, you will need to ensure that port 53 traffic is allowed for DNS requests, and ports like 80 and 443 for HTTP and HTTPS traffic respectively. If there are other protocols that you are using over the VPN then you will need to add rules for them as well.
After adding those rules, disable and re-enable UFW to restart it and load the changes from all of the files you’ve modified:
$ ufw disable
$ ufw enable
You can confirm the rules are in place by running the ufw status command. Run it, and you should receive output like the following:
$ ufw status
Status: active

To                         Action      From
--                         ------      ----
51280/udp                  ALLOW       Anywhere
22/tcp                     ALLOW       Anywhere
51280/udp (v6)             ALLOW       Anywhere (v6)
22/tcp (v6)                ALLOW       Anywhere (v6)
Your WireGuard Server is now configured to correctly handle the VPN’s traffic, including forwarding and masquerading for peers. With the firewall rules in place, you can start the WireGuard service itself to listen for peer connections.
3.3 Starting the WireGuard Server
WireGuard can be configured to run as a systemd service using its built-in wg-quick script. While you could manually use the wg command to create the tunnel every time you want to use the VPN, doing so is a manual process that becomes repetitive and error prone. Instead, you can use systemctl to manage the tunnel with the help of the wg-quick script.
Using a systemd service means that you can configure WireGuard to start up at boot so that you can connect to your VPN at any time as long as the server is running. To do this, enable the wg-quick service for the wg0 tunnel that you’ve defined by adding it to systemctl:
$ systemctl enable wg-quick@wg0
Now start the service:
$ systemctl start wg-quick@wg0
Double check that the WireGuard service is active with the following command. You should see active (running) in the output:
$ systemctl status [email protected]
● [email protected] - WireGuard via wg-quick(8) for wg0
     Loaded: loaded (/lib/systemd/system/[email protected]; enabled; vendor preset: enabled)
     Active: active (exited) since Wed 2021-08-25 15:24:14 UTC; 5s ago
       Docs: man:wg-quick(8)
             man:wg(8)
             https://www.wireguard.com/
             https://www.wireguard.com/quickstart/
             https://git.zx2c4.com/wireguard-tools/about/src/man/wg-quick.8
             https://git.zx2c4.com/wireguard-tools/about/src/man/wg.8
    Process: 3245 ExecStart=/usr/bin/wg-quick up wg0 (code=exited, status=0/SUCCESS)
   Main PID: 3245 (code=exited, status=0/SUCCESS)

Aug 25 15:24:14 wg0 wg-quick[3245]: [#] wg setconf wg0 /dev/fd/63
Aug 25 15:24:14 wg0 wg-quick[3245]: [#] ip -4 address add 10.8.0.1/24 dev wg0
Aug 25 15:24:14 wg0 wg-quick[3245]: [#] ip -6 address add fd0d:86fa:c3bc::1/64 dev wg0
Aug 25 15:24:14 wg0 wg-quick[3245]: [#] ip link set mtu 1420 up dev wg0
Aug 25 15:24:14 wg0 wg-quick[3245]: [#] ufw route allow in on wg0 out on eth0
Aug 25 15:24:14 wg0 wg-quick[3279]: Rule added
Aug 25 15:24:14 wg0 wg-quick[3279]: Rule added (v6)
Aug 25 15:24:14 wg0 wg-quick[3245]: [#] iptables -t nat -I POSTROUTING -o eth0 -j MASQUERADE
Aug 25 15:24:14 wg0 wg-quick[3245]: [#] ip6tables -t nat -I POSTROUTING -o eth0 -j MASQUERADE
Aug 25 15:24:14 wg0 systemd[1]: Finished WireGuard via wg-quick(8) for wg0.
The output shows the ip commands that are used to create the virtual wg0 device and assign it the IPv4 and IPv6 addresses that you added to the configuration file. You can use these rules to troubleshoot the tunnel, or with the wg command itself if you would like to try manually configuring the VPN interface.
With the server configured and running, the next step is to configure your client machine as a WireGuard Peer and connect to the WireGuard Server. Wireguard clients are available for almost every popular operating system such as Windows, Linux, Android, IOS, Mac OS, and many more. You can simply download the proper client and pass the client configuration file which you downloaded from wireguard-ui and connect to the server. (Download wireguard client)
Note: when ever you want to add more clients to the server, just run wireguard-ui and add your clients. After terminating the wireguard-ui, you have to restart the wireguard service using
systemctl restart wg-quick@wg0. If you didn’t add Post and Pre Scripts to the wireguard config file like the previous section, you have to run iptables MASQUERADE rules again.
5. Revers Proxy
Congratulations, till now, you have configured a Virtual private network for your self but you might not be able to connect to the network directly in situations the government restricts users from connecting to the outside world as regards your outer VPN server is out there. To make your clients escape from the local intranet, you need a second machine inside a local data-centers which is connected to the public internet. That machine would be your middle server or the bridge to connect to the VPN server that you have configured previously. One simple solution to use this middle server as a bridge is setting a proxy on that middle server which redirects our requests to the target VPN server. In computer networking, a proxy server is a server application that acts as an intermediary between a client requesting a resource and the server providing that resource(Wikipedia).
5.1 Nginx Reverse Proxy
Nginx is a popular web-server application that is used to deploy various web applications and it has so many capabilities. One of the configurations that you can set for Nginx is to redirect incoming requests to a specific address by setting proxy routes. As we know that WireGuard traffic is a stream of data and its UDP. So, we have to set a stream proxy route for our purpose.
This time, let’s connect to our middle server using ssh and after updating its packages, install Nginx on that machine.
$ apt install nginx --yes
After that, open Nginx configuration file from /etc/nginx/nginx.conf using vim or your preferred editor:
$ vim /etc/nginx/nginx.conf
Then add a stream section at the end of that file and write your proxy config there:
stream {
    server {
        listen 51820 udp;
        proxy_pass 77.222.67.140:51820;
    }
}
Save and exit when you are done. Restart nginx:
$ service nginx restart
Note: In the config above, I opened 51820 port on my middle server and redirected incoming requests through this port to the target VPN server which we have wireguard installed. The first port number on the config
51820is the port that I want to open on my middle server and the other one is the port I chose for my VPN server. You have to change these numbers if you chose something else.
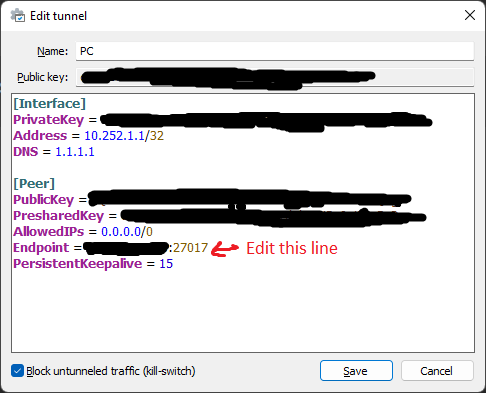
Now your clients should be able to connect to the VPN server through the middle server by changing the Endpoint on their configuration.
[Interface]
PrivateKey = [CLIENT_PRIVATE_KEY]
Address = 10.252.1.1/32
DNS = 1.1.1.1

[Peer]
PublicKey = [PUBLIC_KEY]
PresharedKey = [PRE_SHARED_KEY]
AllowedIPs = 0.0.0.0/0
Endpoint = 77.222.67.140:51820 --> change this address to  YOUR_MIDDLE_SERVER_IP:51820
PersistentKeepalive = 15
After editing the config file on the client’s machines:
[Interface]
PrivateKey = [CLIENT_PRIVATE_KEY]
Address = 10.252.1.1/32
DNS = 1.1.1.1

[Peer]
PublicKey = [PUBLIC_KEY]
PresharedKey = [PRE_SHARED_KEY]
AllowedIPs = 0.0.0.0/0
Endpoint = 192.168.0.1:51820
PersistentKeepalive = 15
5.2 Nginx on docker
As the Nginx docker image is available on the docker hub, you can use the Nginx container instead of installing Nginx on a separate VM. You can run your proxy server on the cloud which is cheaper cost beneficial than renting a virtual machine. Also, some proxy managers are available on docker-hub with a web-based interface such as the popular nginx-proxy-manager.
6. WireGuard Over TCP (Optional)
Wireguard itself is working only on UDP because it aims to be as fast as possible but, some providers may block UDP packets using their firewalls. This will make us some problems and prevents WireGuard to work properly. To tackle this issue, we have to convert UDP packets into TCP packets and transfer them through the network after delivering the packets to the VPN server, revert the TCP packets into UDP and pass them to the WireGuard service. This goal can be reached using udptunnel. (udp2raw is another popular UDP to TCP converter)
Note: Udptunnel does not support IPv6.
Udptunnel is a simple application written in c and It should be run on two endpoints. On one end, it listens to incoming UDP packets on a specific port and converts them to TCP packets, then it transfers the TCP packet to the destination address which is running a udptunnel server on the other endpoint. In our case, the first endpoint is our middle server which is the local server inside the local intranet. Obviously, the second endpoint is our machine inside the outer world.

Udptunnel can be run in two modes server mode and client mode. You have to run the first instance in client mode and the second one as the server. In server mode it listens for TCP packets and transfers them back into UDP and in client mode receives UDP packets and transfers them to TCP.
Let’s start with the server, the machine located in the open world. First, we have to download the source code of udptunnel:
$ wget https://github.com/rfc1036/udptunnel/archive/refs/heads/master.zip
Then we have to build the source code using the build-essential make but before that, run the command below to be sure you have the required packages:
$ sudo apt install build-essential pkg-config zip unzip -y
Let’s unzip the downloaded source codes:
$ unzip master.zip
And build the source files:
$ cd udptunnle-master
$ sudo make
$ sudo make install
Now let’s pick a TCP port and open the port on the firewall (I chose port 8080):
$ sudo ufw allow 8080/tcp
$ sudo ufw disable
$ sudo ufw enable
Then run the udptunnel as server:
$ udptunnel --server 0.0.0.0:8080 --verbose 127.0.0.1:51820
It listens to the incoming TCP packets from everywhere converts the into UDP and passes them through port 51820 on the localhost which is the WireGuard server port.
Now jump into the middle server and, download and build the udptunnel source codes:
$ sudo apt install build-essential pkg-config zip unzip --yes
$ wget https://github.com/rfc1036/udptunnel/archive/refs/heads/master.zip
$ unzip master.zip
$ cd udptunnle-master
$ sudo make
$ sudo make install
Pick a udp port, (I chose 8080 again!)
$ sudo ufw allow 8080
$ sudo ufw disable
$ sudo ufw enable
And run the udptunnel client on the middle server:
$ udptunnel 0.0.0.0:8080 77.222.67.140:8080
Note: In the code above,
77.222.67.140was the outer machine’s address.
That’s it, go change the endpoint address to the new UDP port on the middle server:
[Interface]
PrivateKey = [CLIENT_PRIVATE_KEY]
Address = 10.252.1.1/32
DNS = 1.1.1.1

[Peer]
PublicKey = [PUBLIC_KEY]
PresharedKey = [PRE_SHARED_KEY]
AllowedIPs = 0.0.0.0/0
Endpoint = 192.168.0.1:51820 --> change this address to  YOUR_MIDDLE_SERVER_IP:8080
PersistentKeepalive = 15
After editing the config file on the client’s machines:
[Interface]
PrivateKey = [CLIENT_PRIVATE_KEY]
Address = 10.252.1.1/32
DNS = 1.1.1.1

[Peer]
PublicKey = [PUBLIC_KEY]
PresharedKey = [PRE_SHARED_KEY]
AllowedIPs = 0.0.0.0/0
Endpoint = 192.168.0.1:8080
PersistentKeepalive = 15
That’s it.
Note: udptunnel is not a background server which means you don’t have to exit the ssh sessions (on middle and outer servers) while running this application. You can build a systemctl daemon, use screen or tmux for running this application to prevent crashing of udptunnel after closing the session.
And remember using WireGuard over TCP will affect your connection speed/bandwidth but some networks block or reduce the bandwidth for UDP connections and we have no other choices but running wire guard over TCP. Here is my experience using WireGuard over TCP:
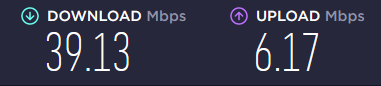
Bandwidth while using UDP and it's not restricted by government's firewall
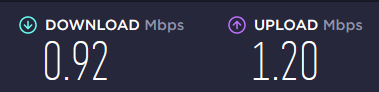
Bandwidth while using UDP and it's restricted by government's firewall
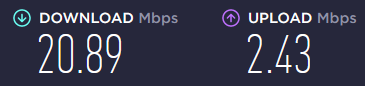
Bandwidth while using WireGuard over TCP
7. Final words
Some of you might have trouble using my solution for making your private network because of port choosing filtered port numbers. If things were not working change the chosen port numbers and try again. In some cases, government firewalls might block UDP packets and you need to do the solution on part 6.
The reverse proxy could be done using some simple firewall (iptables) rules but I chose Nginx to not be confused with iptables complexities and concepts.
WireGuard VPN server is the newest and best VPN protocol in the world till now, it is secure, fast, and easy to configure, and that’s why I chose this protocol to go within this article, but in extreme cases, it can be detected and your servers could be blocked.
To tackle this, keep the number of your clients as low as possible to prevent high network traffic from going through these servers. Also, you can use other VPN protocols using this abstract solution and find the one which works for you (such as Shadowsocks, Google Outline, OpenVPN, Softether, V2ray, etc.). If you have problems with this article reading the article’s references and a little search on DuckDuckGo (Or google) might help you to find the solution. I hope you find this article useful.
for a better world,
Regards
Comment Channel